
Weak and pwned passwords accounted for 73% of breaches in the last year, as reported by Verizon and Rapid7. Do you know how many of your users are using a blacklisted password?
If you test user passwords, you’ll know Microsoft has never made it easy. There are always tricks to export password hashes but each method has its pros and cons.
The New NIST Password Guidelines make sensible new recommendations. The current climate of data breaches is at the heart of one of its major changes. That is: check a user password against a corpus of breached data.
A password audit is a very effective way of demonstrating this area of weakness. of the most prevalent attacks today: Password Spraying and Credential Stuffing.
This is a two-step process. Dump the hashes from a DC first, and then compare the hashes to a list of breached passwords/hashes. Various ways to grab the hashes exist, each carrying some risk as it’s an unsupported process. Techniques for obtaining the hashes from a Windows Domain Controller boil down to:
Dumping the LSASS (Local Security Authority Subsystem) process space is the oldest method. This is the historical way of extracting domain hashes within a Windows eco-system. Several tools and techniques exist to do that, one of the most common and reliable is Mimikatz.
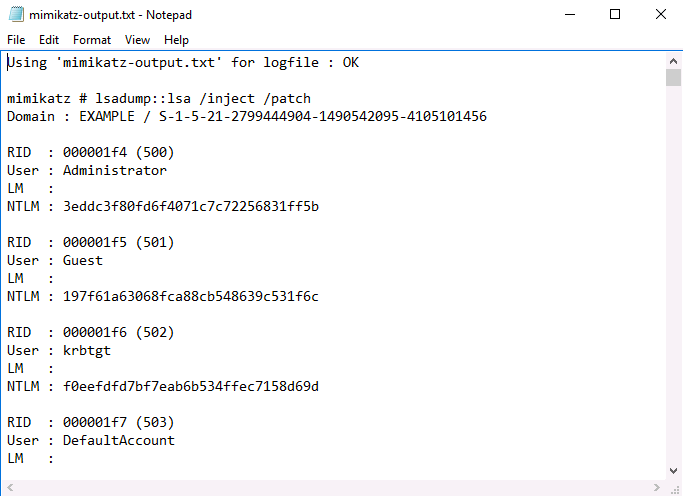
Start mimikatz.exe and type the following commands:
privilege::debug
log mimikatz-output.txt
lsadump::lsa /inject /patch
The first command takes care of granting the privileges required. The second sets a log file for the output. The final command instructs the tool on which technique to use (LSASS Injection).
Once this is complete, the log file created should look like this:
But it needs to be in a pwdump format and look like this:
user:hashNote: this is not the full pwdump format but it’s all that’s needed here
A few lines of awk (after stripping out the header/footer of the log file) will suffice:
# cat mimi.awk
BEGIN { RS = "" ; FS = "\n" ; ORS =""; OFS=""}
{ sub(/User : /,""); print $2 ","}
{ sub(/NTLM : /,""); print $4}
{ print "\n"}A safer way is to rely on the Windows built-in Vssadmin (Volume Shadow Copy) utility. VSSadmin can take a copy of the c:\Windows\NTDS\NTDS.dit file (this file is locked as it’s used by LSASS).
This method is less disruptive, much less likely to get caught by AV and unlocks the password history too. It can take up a lot of space, as the NTDS.dit can grow pretty large. It also might increase the risk of detection and network disruption as a result.
To create a shadow copy and copy the required files (NTDS.dit, SYSTEM, SAM), the commands are as follows:
vssadmin create shadow /for=C: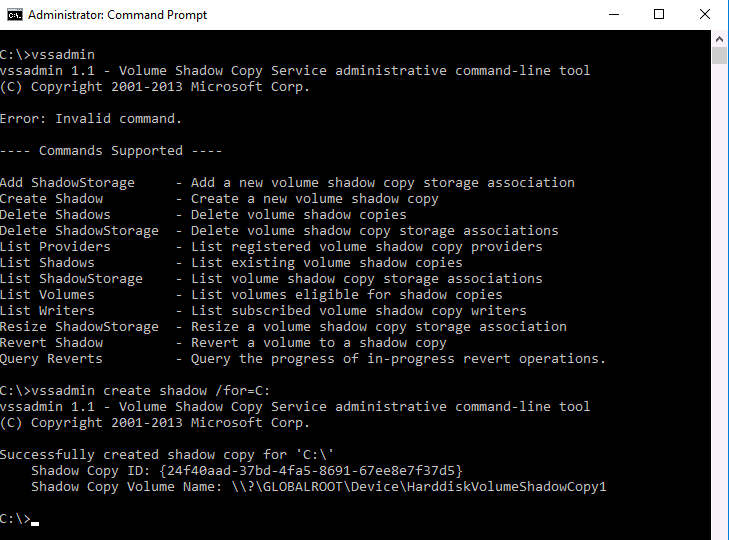
copy \\?\GLOBALROOT\Device\HarddiskVolumeShadowCopy1\Windows\system32\ntds\ntds.dit c:\temp
copy \\?\GLOBALROOT\Device\HarddiskVolumeShadowCopy1\Windows\system32\config\system c:\temp
copy \\?\GLOBALROOT\Device\HarddiskVolumeShadowCopy1\Windows\system32\config\sam c:\temp
vssadmin List shadows
vssadmin Delete Shadows /shadow={Shadow Copy ID}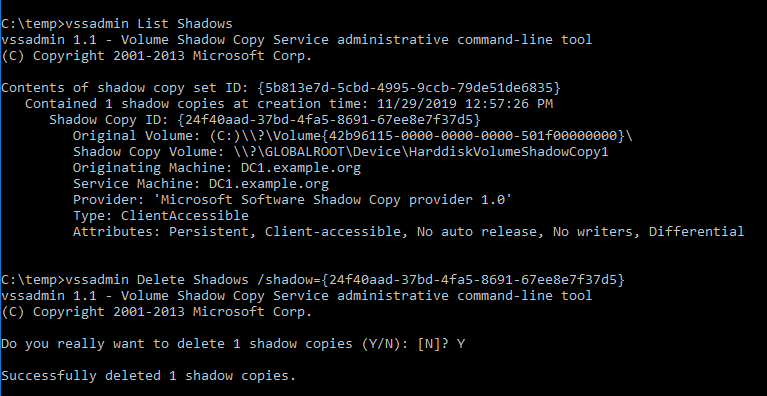
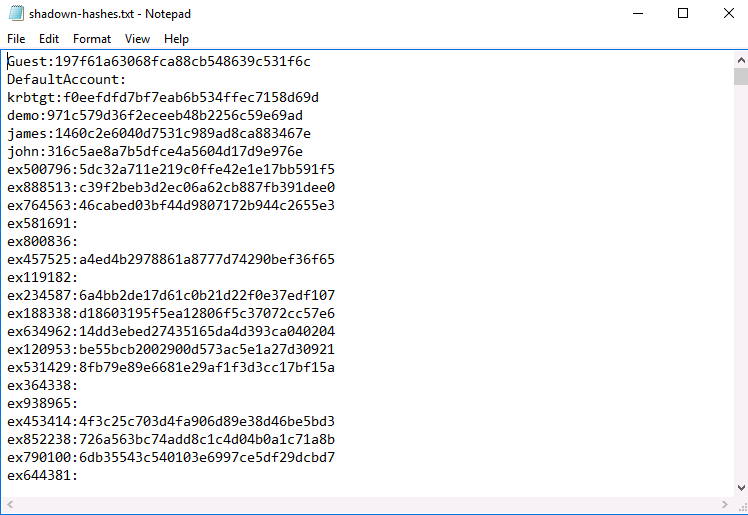
The DSInternals Powershell Module will convert it into a suitable format for cracking:
$key = Get-BootKey -SystemHiveFilePath 'c:\temp\system'
Get-ADDBAccount -All -DBPath 'c:\temp\ntds.dit' -Bootkey $key | Format-Custom -View HashcatNT | Out-File shadow-hashes.txt -Encoding ASCII
The above will process a copy of the NTDS.dit file, extract user and hash information, format it in a hashcat-compatible output and write it to a file.
The safest method of obtaining domain hashes is to (ab)use the ‘Domain Replication Service’. This works by temporarily spawning up a new Domain Controller on the network and syncing up the credential storage to it.
The steps to perform this are as follows:
The DSInternals package needs to be installed, as follows:
Install-Module -Name DSInternals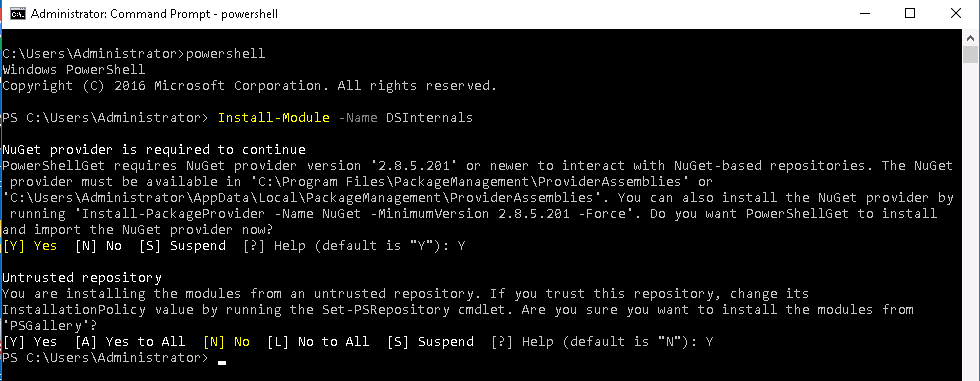
Enter credentials by running the following powershell command:
$credentials = Get-CredentialThe following will dump those pesky hashes:
Get-ADReplAccount -all -NamingContext “DC=Example,DC=org” -Server DC1 -Credential $mycredentials | Format-Custom -View HashcatNT | Out-File c:\temp\hashes.txt -Encoding ASCIINote: Ensure you change the domain and DC according to your environment (here Example, org, and DC1)
The above will produce a hashcat-compatible ASCII plain-text file to compare against the HIBP hashes.
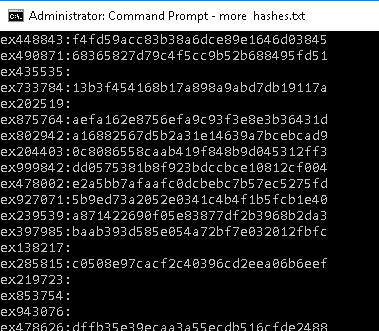
This is how hashes.txt will look like:
So which users on the network are vulnerable? Let’s explore a couple of ways of doing this.
A good wordlist of compromised passwords is needed. There are various lists of cracked passwords over at hashes.org, such as:
John the Ripper and Hashcat are amongst the most respected crackers out there. Usage for these is as follows:
john --format=nt hashes.hashcat --wordlist=hashes.org-2019.txthashcat -m 1000 -a 0 --username hashes.hashcat hashes.org-2019.txtOn a very modest system, it takes less than a couple of minutes to run through the dictionary file which results in the output below:
$ john --show --format=nt hashes.hashcat|tail
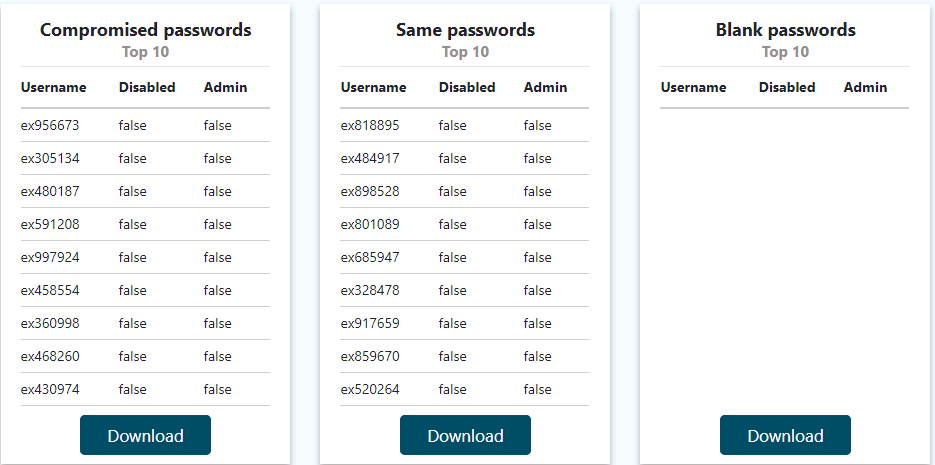
ex468260:budlight
ex360998:passw0rd
ex458554:Mother21
ex997924:Number44
ex591208:Welcome14
ex480187:Lauren24
ex305134:Claire1987
ex956673:abcd1234
323 password hashes cracked, 329 left
----
$ hashcat --username --show -m 1000 hashes.hashcat |tail
ex665602:a4e7a61a102b34f0e0a15e4cc1e8ab77:Liverpool123
ex999378:d59287f790dcbcf24f1bbd8c4703bd54:Password17
ex295780:d59287f790dcbcf24f1bbd8c4703bd54:Password17
ex939490:c5ab70617cae17f46f60a2f175bb5386:Champs02
ex499827:37184b08e38ae6f5057b94141722fa65:M0nday30
ex178773:cab8e82c0ea675f7e3744c808cf3209b:Butterfly29
ex852117:cab8e82c0ea675f7e3744c808cf3209b:Butterfly29
ex472603:cab8e82c0ea675f7e3744c808cf3209b:Butterfly29
ex453529:2fa2b0486ca0fff77ba6ce64d640d864:Central02
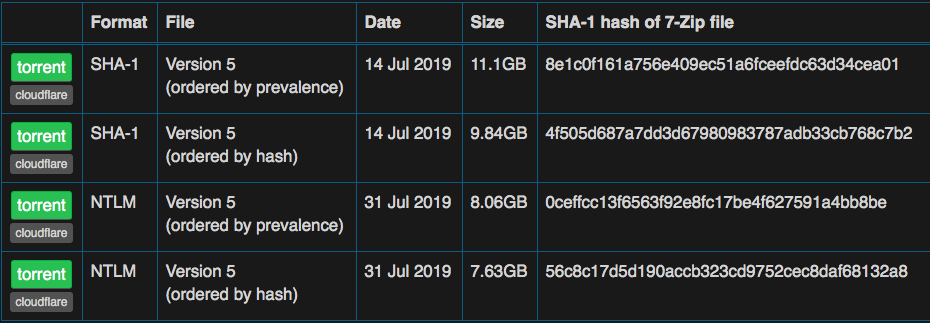
ex808769:4b21ab52ba9834f8cd167effc7ec087e:Christmas12To perform this check offline, download a copy of the Have I Been Pwned database, in NTLM format (ordered by hash). It’s not a good idea to perform the password check online.
The latest version of the HIBP database is here:
https://haveibeenpwned.com/Passwords
At the time of writing, this is version 5.
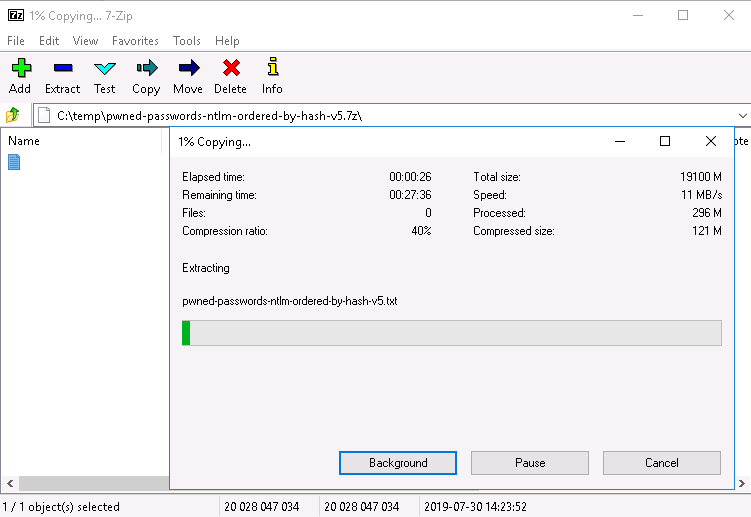
Extracting it (with 7zip) can take a while:
The final step is to compare the HIBP database containing the NTLM hashes (sorted by hash) in c:\temp\ with the extracted the hashes in the same folder.
This script will make it easy:
powershell -Executionpolicy bypass
Import-Module .\Match-ADHashes
The comparison of the hashes is done using the Match-ADHashes function.
$list = Match-ADHashes -ADNTHashes C:\temp\hashes.txt -HashDictionary C:\temp\hibp.txtThe above command will populate the $list list variable with the results (Note: this might take a while). The results can be exported into a more useful format and write it to disk:
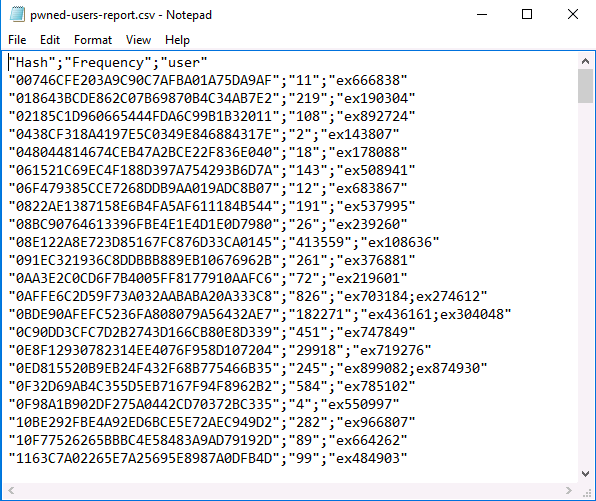
$list | select Hash,Frequency,@{Name=’user’;Expression={[string]::join(“;”, ($_.user))}} | Export-Csv -Path c:\temp\pwned-users-report.csv -Delimiter ‘;’ -NoTypeInformationNote: Frequency is the number of times that password(hash) has been seen collectively within the Have I Been Pwned leaked database.
The above will pipe the contents of $list into a CSV file with the matching hash, a count and the list of pwned users.
Pipal is a useful utility written by Robin Wood to perform an analysis of user passwords. You have to have access to the plain-text of the password in order to gather any useful information.
Usage of the tool is pretty simple, no external library is needed, just Ruby installed.
Running Pipal on the results obtained yields the following output:
$ ./pipal.rb found.txt
Generating stats, hit CTRL-C to finish early and dump stats on words already processed.
Please wait...
Processing:    100% |oooooooooooooooooooooooooooooooooooooooooo| Time: 00:00:00


Basic Results

Total entries = 346
Total unique entries = 285

Top 10 passwords
Butterfly29 = 3 (0.87%)
Password2 = 3 (0.87%)
Reind33r = 3 (0.87%)
Tanzania3 = 3 (0.87%)
Password284 = 3 (0.87%)
Tilling7 = 3 (0.87%)
Christian7 = 3 (0.87%)
Babybrain3 = 3 (0.87%)
1111111111 = 2 (0.58%)
Molly154 = 2 (0.58%)

Top 10 base words
password = 28 (8.09%)
welcome = 5 (1.45%)
london = 5 (1.45%)
victoria = 4 (1.16%)
tilling = 3 (0.87%)
tanzania = 3 (0.87%)
christmas = 3 (0.87%)
jessica = 3 (0.87%)
april = 3 (0.87%)
liverpool = 3 (0.87%)

Password length (length ordered)
8 = 155 (44.8%)
9 = 85 (24.57%)
10 = 57 (16.47%)
11 = 34 (9.83%)
12 = 14 (4.05%)
14 = 1 (0.29%)

Password length (count ordered)
8 = 155 (44.8%)
9 = 85 (24.57%)
10 = 57 (16.47%)
11 = 34 (9.83%)
12 = 14 (4.05%)
14 = 1 (0.29%)

<--output stripped for brevity-->
Pipal can be used to get a good insight into what common passwords are being used on the Active Directory Domain being tested. This knowledge can be used to create relevant exclusion wordlists to prevent users from setting common, easy-to-guess passwords.
It’s easy to check how many Windows domain users are using compromised passwords. It’s also rather convoluted and error-prone as well as very time-consuming.
What if there were an automated way of checking this that:
The efficiency of this process can be significantly improved. Comparison times can be optimized down to milliseconds.
Pwncheck is the currently most optimal way of getting a list of pwned users. No installation needed, nor Domain Admin privileges.
The 3 privileges that pwncheck needs can be granted like so:
#Just substitute the pwncheck account below with the account you want to assign replication privileges with

$Account = "pwncheck"

$RootDSE = [ADSI]"LDAP://RootDSE"
$DefaultNamingContext = $RootDse.defaultNamingContext

$cmd = "dsacls '$DefaultNamingContext' /G '`"$Account`":CA;`"Replicating Directory Changes`";'"
Invoke-Expression $cmd
$cmd = "dsacls '$DefaultNamingContext' /G '`"$Account`":CA;`"Replicating Directory Changes All`";'"
Invoke-Expression $cmd
$cmd = "dsacls '$DefaultNamingContext' /G '`"$Account`":CA;`"Replicating Directory Changes In Filtered Set`";'"
Invoke-Expression $cmd
Running pwncheck is a three-step process:
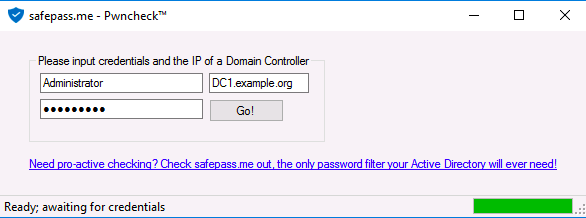
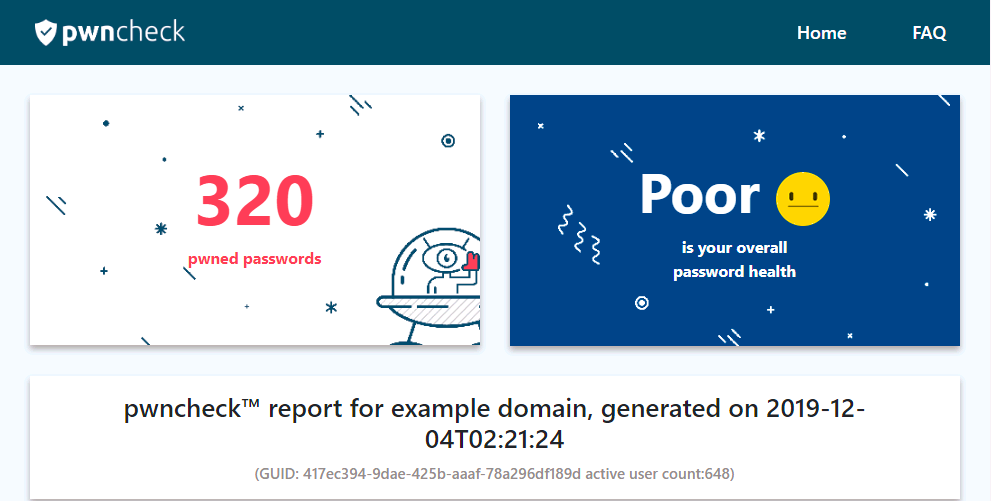
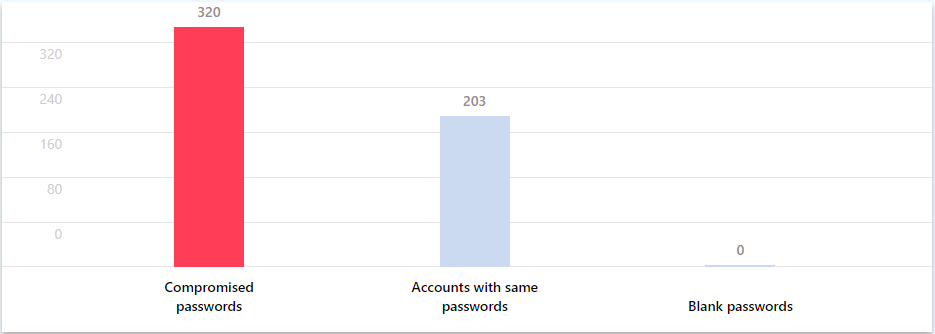
After a few seconds, the pwncheck GUI will:
The README.html file containing the password audit results can then be viewed for the full report:

If you like this new approach, or if you have any comments, we’d love to hear from you!
You can email me at
You can see it in action here: pwncheck demo